
Tarjetería
Tarjetería · 16. diciembre 2018

Hi! I've written this post just to offer a more detailed explanation to you about how we can create a waterfall slider or a Flip Slider without any kind of die so that we can adapt the size of the to our needs, First of all I'd like to clarify that both waterfall and flip sliders are just the same thing, it just depends on which orientation the display them, they will receive just one name or the other. If we organize them vertically, they are called waterfall sliders, as they resemble a...
Tarjetería · 09. diciembre 2018

Hi everyone! I'm really excited today as I'm sharing my first Christmas Card from this year's series. So for today I've got a special type of sliding card -you know I love sliding cards!- called Peek-a-boo Card. It works as another sliding card, there's something in the card that slides. However, in this kind of cards there's no extra mechanism to make the elements slide; they simply slide when you open the card and... surprise! the main image changes by magic. If you want to know how I made...
Tarjetería · 29. octubre 2018
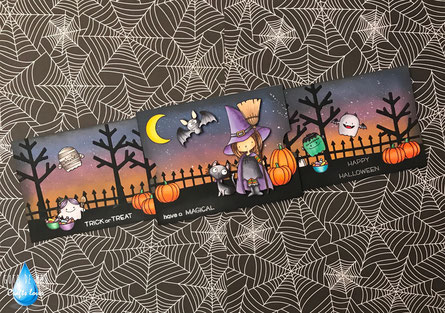
Halloween is about to come and I always love to make a special card for this holiday. For this occasion, I've created a surprising double sliding card which includes three cute scenes with a shinny sentiment on each panel. To make my card, I used three pieces of cardstock measuring as follows: · CENTRAL PANEL: 8.75" x 11", scoria at 4.25 and then at 8.5, leaving a 0.25 flap that will lock the whole system. · INNER PANELS: 3.875" x 5.5" (3-7/8 x 5-1/2). · MECHANISM: 4.1875" x 5.375" (4-3/16 x...
Tarjetería · 25. abril 2018
Hello and welcome back! Today I'm posting a wonderful shaker card to giveto someone celebrating his birthday. Check the video below or go to my YouTube channel! I hope you like it!
Tarjetería · 12. febrero 2018
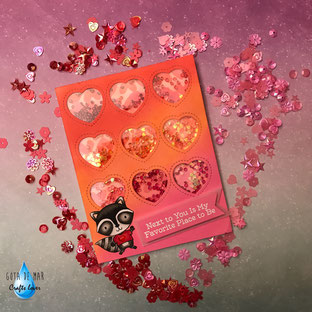
Hello and thank you for stopping by. I hope your weekrnd has been a wonderful one and that you are getting ready to celebrate Saint Valentine's Day. I've created a very special card for this occasion, one of my favorite cards ever, a shaker card, of course!! So, Let's begin... The first thing I did was to get to panels of 4 1/4" x 5 1/2" from Neenah Solar White 80Lb cardstock. For my first panel (the one under the windows), I used my Full of Hearts stencil by My Favorite Things. I secured to my...
Tarjetería · 07. octubre 2017

I am very excited about having created this shadow box card. Halloween is coming and I wanted to create something a little bit different from usual Halloween cards. So, I decided to turn it into a shadowbox card using Lawn Fawn's dies and stamps. So, the first thing I did was to die cut the shadow box structure running the dies through my Big Shot Plus. Since it was going to be a Halloween card, I decided to use black cardstock for this purpose. Later, I die cut the slopes where my critters...
Tarjetería · 10. diciembre 2014
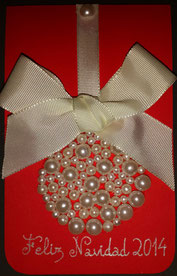
Hello everyone and thanks for stopping by! Today I'm very excited to share this Crhistmas project with you. As you can see on the picture, it is a x-mas card with an incredible embellishment that makes the focal point of the card. So let's get started. First of all, I trimmed off a 3 1/8" x 5" note card base from schoolhouse red cardstock and rounded the bottom corners with my Corner Chomper at 1/2". Next, I die cut a circle of 2" from red felt (as similar to the color of your cardstock as...


